 by
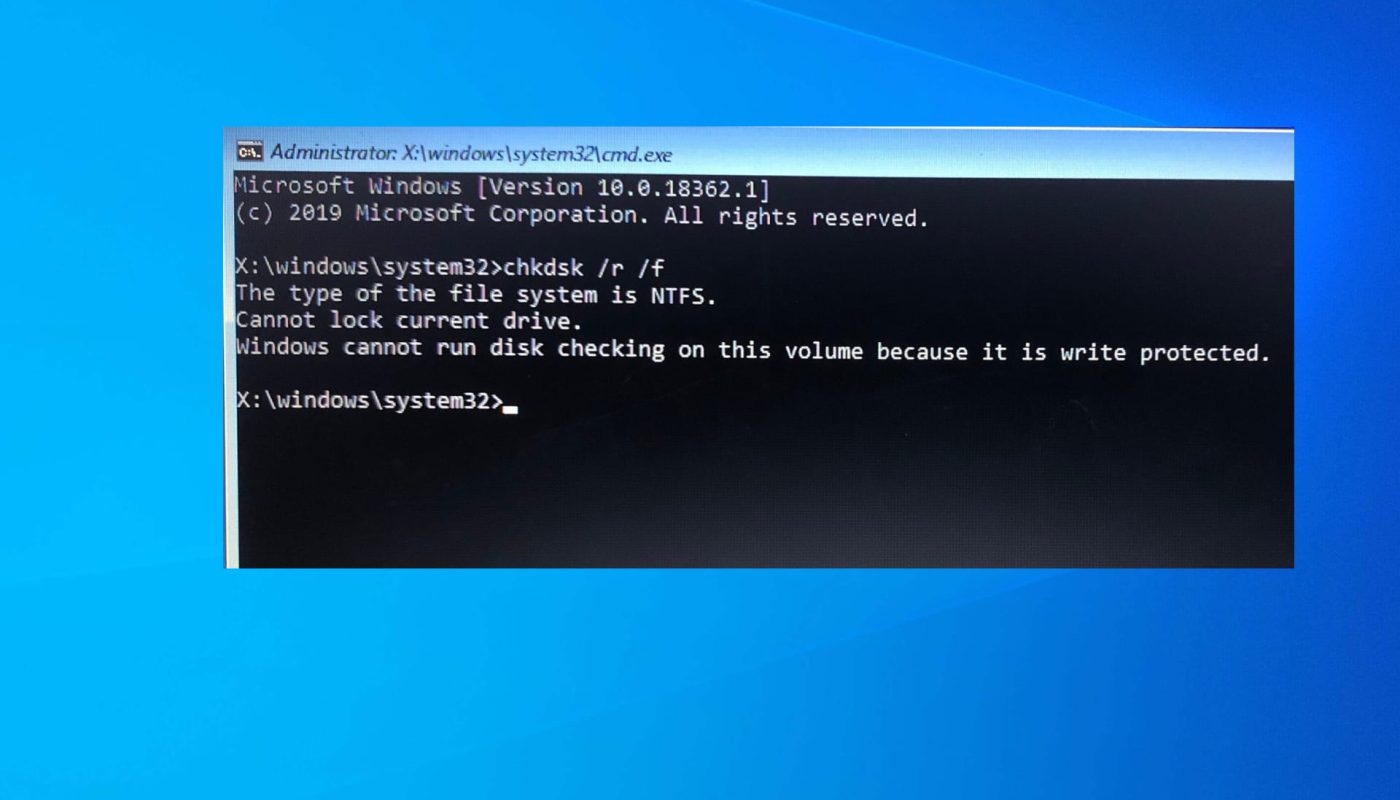
by If you’ve ever seen the error message “Windows Cannot Run Disk Check Write Protected,” then you know how frustrating it can be. This error usually comes up when you’re trying to run a disk check or defragment your hard drive, and it can be a real pain to deal with. Here are some tips on how to fix this problem.
If you’re trying to run a disk check on Windows and getting the “cannot write protected” error, there are a few things you can try. First, make sure that you have administrative privileges. If you don’t, the disk check will not be able to fix any errors it finds.
Second, try running the disk check from Safe Mode. This will bypass any programs that may be causing problems. Finally, if all else fails, you can use the Command Prompt to run a disk check with the appropriate parameters.
Diskpart Failed to Clear Disk Attributes
“Diskpart Failed to Clear Disk Attributes” is a relatively common error message that can occur when using the Windows Diskpart utility. The error typically occurs when an attempt is made to clear the read-only attribute from a disk. This article provides some background information on the error and how to resolve it.
The Windows Diskpart utility is a command-line tool that allows users to manage disks, partitions, and volumes. It is commonly used to create and delete partitions, format disks, and assign drive letters. The utility can also be used to modify disk attributes such as the read-only attribute.
When the “Diskpart Failed to Clear Disk Attributes” error occurs, it means that there was an issue clearing the read-only attribute from the selected disk. This can happen for a number of reasons including if the disk is in use or if it is protected by another application.
To resolve the error, you will need to first determine what is causing it.
If the disk is in use, you will need to unmount it or close any applications that are using it before retrying the operation in Diskpart. If the disk is protected by another application, you will need to disable that protection before proceeding. Once you have taken care of those issues, you should be able to clear the read-only attribute from the disk without any problems.
How Do I Run Chkdsk on a Disk That is Write-Protected?
If you are attempting to run CHKDSK on a disk that is write-protected, you will not be able to do so. In order to run CHKDSK, the disk must not be write-protected.
Can’T Run Chkdsk Because Drive is Locked?
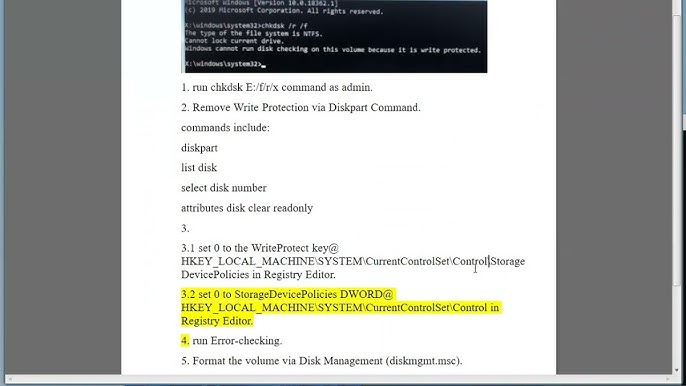
If you can’t run CHKDSK because the drive is locked, there are a few things you can try. First, you can try running CHKDSK from the command prompt. To do this, open the Command Prompt and type “chkdsk /r” (without the quotes).
This will attempt to repair any errors on the drive. If that doesn’t work, you can try using a third-party disk utility to check and repair the drive. There are many different ones available, so you’ll need to research which one would be best for your particular situation.
Finally, if all else fails, you may need to contact a professional data recovery service to see if they can help recover any lost data from the drive.
How Do I Remove Write Protection from a Windows Drive?
Assuming you would like to remove write protection from a USB drive in Windows:
1. Plug in the USB drive you wish to modify.
2. Open My Computer and locate the drive letter associated with your USB drive.
In this example, the drive letter is E.
3a. If you see a Security tab, then your particular brand of USB flash memory does not support hardware write-protection, and the only way to make it writable again is to format it, which will erase all data currently on the device.
Proceed to step 4.
3b. If you do _not_ see a Security tab:
4a. Right-click on the icon for your USB drive and select Properties from the drop-down menu that appears.
4b.
Select the General tab (this should be selected by default).
5a. If there is no check mark next to Read-only, then your device does not have hardwarewrite-protection enabled and no further action is necessary; simply close out of all dialog boxes by clicking OK twice, once on each open window.
Your device is now ready for normal use! However, if there _is_ a check mark next to Read-only:
5b1) Double click on WriteProtect in the right hand pane; a new dialog box should appear that says “Value Name: WriteProtect”.
The box under “Value data” should say 0; if it does not, delete whatever value is present and type 0 into this field before clicking OK at the bottom of this small dialog box _and_ at the bottom of the larger Properties window that opened when Step 4 was initiated.. Close out of any remaining open windows/dialogs (elegantly by using Alt+F4 or less so by just clicking [x] in their upper right hand corners) until you return to My Computer’s main window–your device should now be fully writable but without admin privileges!
How Do I Fix a Write-Protected Disk in Windows 10?
Assuming that you’re referring to a write-protected error when trying to save files to a disk, there are a few potential solutions:
1. Check the permissions for the specific file or folder you’re trying to save to. Right-click on it and select “Properties.”
Under the “Security” tab, make sure that your user account has permission to read and write to the file/folder. If not, you can click “Edit” and add your user account with the appropriate permissions.
2. If you’re still getting a write-protected error, try saving the file to a different location on the disk.
Sometimes certain areas of disks can become corrupted and cause writing errors.
3. In some cases, third-party security software can cause write-protection errors. Try temporarily disabling any security software you have running and see if that fixes the problem.
4. If none of the above work, there’s a chance that the disk itself is physically damaged or write-protected. In this case, you’ll need to either replace the disk or use a different storage device altogether.
Windows cannot run disk checking because it is write protected
Conclusion
If you’ve ever tried to run a disk check in Windows, only to receive the error message “Windows cannot run disk check because the drive is write-protected,” then this article is for you.
The reason this error occurs is because, by default, Windows will attempt to lock the drive during a disk check in order to prevent any changes from being made to the file system. However, if the drive is already locked (for example, if it’s a read-only drive or if it’s been set as such in the registry), then Windows won’t be able to lock it and the disk check will fail with that error message.
There are two ways to fix this problem. The first is to simply remove the write protection from the drive. You can do this by opening up Disk Management (press Win+R, type “diskmgmt.msc”, press Enter), right-clicking on the drive in question, and selecting “Change Drive Letter and Paths.”
From there, click on “Remove” and confirm that you want to do so. Keep in mind that this will only work if the write protection is coming from an external source like a switch on your USB drive; if the write protection is built into the device itself (like many SD cards), then this method won’t work.
The second way to fix this problem is to run Disk Check from Safe Mode.
To do so, reboot your computer and press F8 while it’s booting up. This should bring up the Advanced Boot Options menu; from here, select “Safe Mode” and press Enter. Once you’re logged into Safe Mode, open up Command Prompt (press Win+R, type “cmd”, press Enter) and type: chkdsk /f X: (replace X with your actual drive letter).