 by
by Most people connect their Cisco wireless router without any problems. However, some users may have difficulty connecting their router to the Internet. This article will provide a step-by-step guide on how to connect a Cisco wireless router.
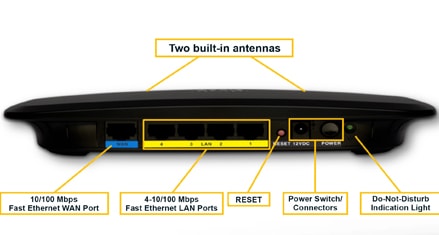
First, make sure that the power cord is plugged into the router and that the router is turned on. Next, locate the Ethernet port on the back of the router. Take an Ethernet cable and plug one end into the Ethernet port on the back of the router and plug the other end into your computer’s Ethernet port.
Once you have done this, open your web browser and type in http://192.168.1.1 in the address bar. This will bring you to the Cisco Connect page where you can enter your username and password. After you have entered your credentials, click on “Apply” and then “Continue.”
You should now be connected to your Cisco wireless router!
- Position your Cisco wireless router in a central location
- This will ensure that you get the best possible signal throughout your home or office
- Connect the power adapter to your Cisco wireless router and plug it into an outlet
- Use an Ethernet cable to connect your computer to one of the numbered ports on the back of your Cisco wireless router
- Open a web browser and enter “192
- 1″ into the address bar without quotation marks
- This will take you to the login page for your router’s configuration settings
- 5
- Enter your username and password when prompted and click “OK
- ” These credentials are found on a sticker on the bottom of most Cisco routers; if you have never changed them, they should be “admin” for both fields
How to Connect Cisco Router to Internet
If you have a Cisco router and want to connect it to the Internet, there are a few things you need to do. First, make sure your router is properly configured. This includes setting up the correct IP address, gateway and DNS settings.
Once your router is configured, you can then connect it to your modem or ISP device using an Ethernet cable. Finally, once everything is connected, power on your devices and test the connection to ensure everything is working as it should.
Credit: www.cisco.com
How Do I Setup My Cisco Wireless Router?
Assuming you would like a blog post discussing how to set up a Cisco wireless router: “Cisco wireless routers are some of the most popular on the market today. Many people use them in their homes and small businesses because they are easy to set up and use. Here is a step-by-step guide on how to set up your Cisco wireless router.
1) First, you will need to connect the power adapter to your Cisco router and plug it into an outlet. Next, take the Ethernet cable and plug one end into the port labeled “Internet” on your router. Then, plug the other end of the cable into your modem.
2) Once everything is plugged in, go ahead and turn on your modem. Wait a few minutes for it to connect to the internet. Once it is connected, turn on your Cisco router.
3) Now it is time to configure your router. To do this, you will need to open a web browser on a computer or laptop that is connected to your network. In the address bar, type in “192.168.1.1” (without quotation marks). This will bring you to the login page for your router.
4) The default username is “admin” and the default password is “password” (again without quotation marks). Enter these credentials and hit enter or click “login”.
5) Once you are logged in, there will be a number of options available for you to change or customize. For now, we will focus on setting up our wireless connection.
6) On the main screen of the interface, find where it says “Wireless Network Name (SSID). Type in whatever name you want for your network here – this can be anything that you like.
7) Further down on this same page, there is an option for “Security Mode” with a drop-down menu next to it. Select WPA2 Personal from this menu.
8) Now we need come up with a password for our network so that others cannot access it without permission. This password should be at least 8 characters long and contain both letters and numbers.
9) Type in this password under both “WPA Shared Key” as well as “Confirm Shared Key” fields below.
10) The last thing we need do before saving our settings is choose which band we want our network broadcasted on – 2GHz or 5GHz?”If you have older devices that don’t support 5GHz frequencies then select 2GHz. Otherwise select 5GHz since its faster speeds are better suited for newer devices like laptops and smartphones..
How Do I Access My Cisco Wireless Router?
Assuming you’re referring to a Cisco home wireless router, the process for accessing it will vary depending on the model. However, most Cisco routers can be accessed by entering “192.168.1.1” into your web browser’s address bar. This should open up the router’s configuration page where you can enter the username and password (the default values are usually “admin” for both).
Once you’re logged in, you’ll be able to change various settings such as the WiFi name and password, enable/disable security features, set up port forwarding, etc. If you’re not sure what any of these settings do, it’s best to leave them alone unless you have a specific reason for changing them.
If you’re having trouble accessing your router or don’t see the 192.168.1.1 address working, check your router’s manual or visit Cisco’s support website for more help.
How Do I Connect My Wireless Router to My Network?
Assuming you would like a blog post discussing how to connect a wireless router to a network:
Most routers come with an Ethernet cable. This is the cable that looks like a large phone jack and is used to connect computers to modems.
The other end of this cable plugs into your broadband modem. Once it is plugged in, turn on your modem and then wait 30 seconds before turning on your router.
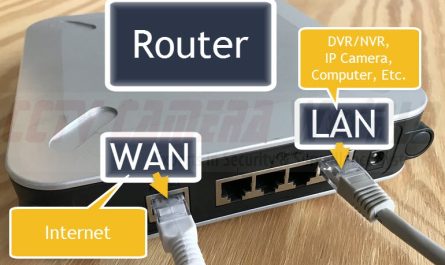
Once your router is turned on, locate the “WAN” or “Internet” port on the back of the device.
This is usually labeled with a globe icon. Take the Ethernet cable that came with your router and plug one end into the WAN port. The other end should plug into an available port on your modem.
If everything is plugged in correctly, the lights next to these ports should light up indicating a connection has been made..
Now we need to configure your router for wireless use.
To do this, we will need to access the web-based interface. This can be done by typing 192.168.1.1 into your web browser’s address bar (the same place you type www..com). If this doesn’t work, check your user manual for instructions on how to find your specific router’s IP address.
.
You should now see a login screen asking for a username and password..
By default, most routers use “admin” for both the username and password but yours may be different so check your user manual if necessary..
Once logged in, look for a section labeled “Wireless Settings” or something similar.. Here you will find options to enable SSID broadcasting as well as choose a name (or SSID) for your network.. Give your network a name and then make sure it is set to broadcast its SSID.. Now save these settings and exit out of the interface page..
How Do I Connect to a Cisco Packet Tracer Wireless Router?
Assuming you would like a step-by-step guide on connecting to a Cisco Packet Tracer wireless router:
1. Download and install the Cisco Packet Tracer program on your computer.
2. Once Cisco Packet Tracer is installed, open the program and click “New Project” in the top left corner.
3. Enter a name for your project and click “Create”.
4. In the new window that pops up, select “Wireless Router” from the list of devices on the left side of the screen and drag it into the workspace area.
5. Double click on the newly added router to open its configuration window.
6. Click on the “Interfaces” tab at the top of this window and then click “Add/Delete Interface.
7. In the new window that appears, make sure that both checkboxes are selected next to “ FastEthernet 0/0″and “FastEthernet 0/1″ before clicking “OK”
8. Now, still in this interfaces configuration window, select each interface one by one (0/0 first then 0/1) and change their status from shutdown to no shutdown by clicking on them so they are highlighted then selecting “no shutdown” from the dropdown menu above where it says Status: Shutdown
9..Click OK
10..The last thing we need to do is configure our router with an IP address so that other devices can connect to it wirelessly..With your mouse, hover over FastEthernet 0/0 until a small yellow box pops up that says “Click here to configure IPv4 Address.” Do this for both interfaces (0/0 then 0/1).
How to Configure Cisco WiFi Router in Cisco Packet Tracer
Conclusion
If you have a Cisco wireless router, you can connect it to your home network in just a few steps. First, make sure that the router is properly plugged into an electrical outlet and your modem. Then, use an Ethernet cable to connect the WAN port on the router to the Ethernet port on your modem.
Next, power on both devices. Once they are powered on, open a web browser and type in 192.168.1.1 into the address bar. This will bring you to the login page for your router.
Enter your username and password (the default username is admin and the default password is admin). Once you are logged in, click on the Wireless tab and then click on Wireless Security. Here you will be able to set up a password for your wireless network.