 by
by Moving a user’s folder to another drive is a process that can be done in a few steps. First, you need to determine where the user’s folder is currently located. Second, you need to identify where you want to move the folder to.
Finally, you need to move the folder using either File Explorer or Command Prompt.
- Open File Explorer and locate the Users folder you want to move
- Right-click on the Users folder and select Properties from the context menu
- In the Properties window, click on the Location tab
- Click on the Move button
- In the Select a Destination dialog box, select the drive you want to move the Users folder to and click on OK
- Click on Apply and then OK in the Properties window to save your changes

How Do I Move User Folder to a Different Drive?
If you’re looking to move your user folder to a different drive, there are a few different ways you can go about it. Here’s a quick rundown of each method:
1. Use the Windows Migration Tool: The Windows Migration Tool is a built-in tool that allows you to easily migrate your files and settings from one computer to another. To use it, simply connect both computers to the same network and run the tool on both machines. The tool will then transfer all of your files and settings over to the new machine.
2. Use File Explorer: If you don’t want to use the Migration Tool, you can also manually move your files using File Explorer. Simply open up File Explorer on both machines and copy your user folder (usually located at C:\Users\[username]) over to the new machine. You may need to adjust some file permissions on the new machine before everything will work properly, but this is usually a fairly easy process.
3. Use an External Drive or Cloud Service Finally, if you’re just looking to move some of your files off of your primary hard drive, you can always copy them over to an external drive or cloud services like Dropbox or Google Drive.
This isn’t ideal for moving everything over, but it can be helpful for freeing up space on your main drive.
Is It Safe to Move the Users Folder to Another Drive?
If you’re considering moving your Users folder to another drive in Windows 10, there are a few things you should know first. For one, it’s not as simple as just moving the folder. You’ll need to do a little bit of work beforehand if you want to avoid any potential problems.
Another thing to keep in mind is that while it is technically safe to move your Users folder, it’s not something that we recommend doing. There are better ways to free up space on your primary drive, like uninstalling unnecessary programs or deleting temporary files. So, if you still want to proceed with moving your Users folder, here’s what you need to do:
1. Open the Registry Editor by typing “regedit” into the Start menu.
2. Navigate to Computer\HKEY_LOCAL_MACHINE\SOFTWARE\Microsoft\Windows NT\CurrentVersion\ProfileList
3. Find out the SID of your user by using this command on cmd “wmic useraccount get name,sid”
4. For each SID (Security Identifier), look for the ProfileImagePath value and change it to reflect the new location of your Users folder.

Moving your Users folder is a relatively simple process, but it’s not something we recommend doing since there are better ways to free up space on your hard drive. So, if you still want to proceed with moving your Users folder, just follow the steps above and you should be good to go!
How Do I Move My Users Folder to Another Drive Windows 11?
Microsoft Windows allows you to move your Users folder to another drive to free up space on your system drive. This is useful if you have a small system drive or if you store a lot of data in your Users folder. Moving your Users folder is easy and only takes a few minutes.
Before you begin, make sure that the destination drive has enough space to accommodate your Users folder. Your Users folder contains all of your personal data, so it can be quite large. Also, make sure that the destination drive is formatted as NTFS.
You cannot move your Users folder to a FAT32 drive. To move your Users folder:
1) Open File Explorer and navigate to your system drive (usually C:\).
2) Right-click on the Users folder and select Properties from the contextual menu.
3) In the Properties window, click on the Location tab.
4) Click on the Move button.
5) In the Select Folder dialog box, browse to the destination drive and select it as the new location for your Users folder. Then click OK.
6) Windows will now move all of the files in your old Users folder to the new location.
This may take some time depending on how large your user data is and how fast your drives are..
How Do I Move My User Folder to Another Drive Windows 7?
If you’re running out of space on your primary drive, or just want to keep your user data separate from the rest of the system, you can move your Windows 7 user folder to another drive. Here’s how:
1. First, open up a new Explorer window and navigate to your current user folder (usually C:\Users\username).
2. Select all of the folders and files inside (excluding any hidden items), and then click and drag them to the new location on another drive. If you’re moving everything to a new hard drive, create a new folder for your user data first.
3. Once everything has been moved over, open up the Start menu and type in “User Accounts”. Select “Change your account name” from the list of results.
4. Enter your new username here, then click OK. You’ll be prompted to enter your password again for security purposes.
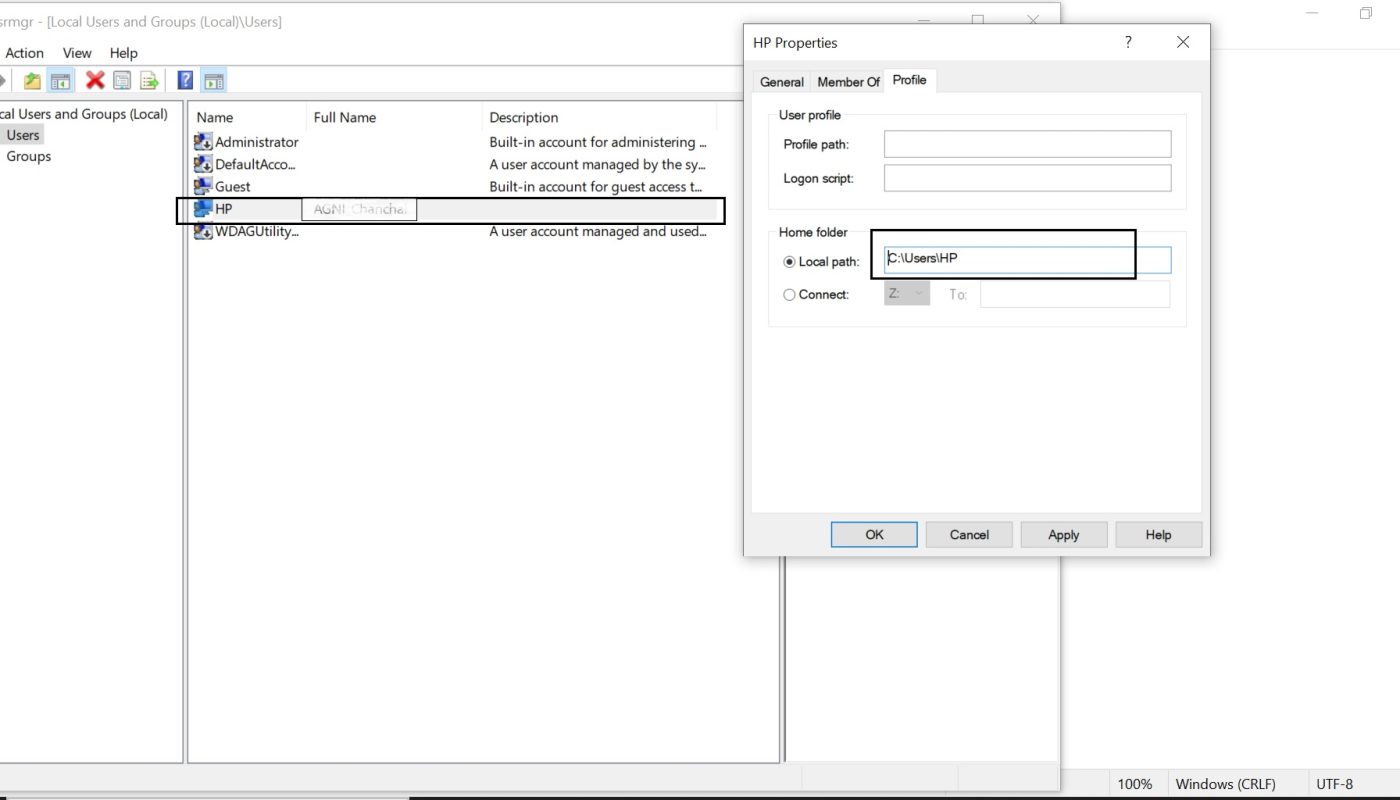
5. Now open up Explorer again and navigate back to your old user folder (C:\Users\oldusername). Right-click on it and select Properties from the context menu.
Moving User Profile Folders in Windows 10
Move Users Folder to Another Drive Windows 11
Moving the Users Folder to Another Drive in Windows 11 The Users folder contains all of the files and folders for each user account on your computer. By default, this folder is located on your computer’s C: drive.
However, if you have multiple hard drives or solid state drives (SSDs), you may want to move the Users folder to another drive. This can help free up space on your C: drive, and it can also help improve performance if you’re using an SSD. To move the Users folder to another drive in Windows 11, follow these steps:
1. Open File Explorer and click on This PC in the left sidebar. Then, right-click on your C: drive and select Properties from the context menu.
2. In the Properties window that opens, click on the General tab and then click on Advanced… under the Performance section.
3. In the next window that opens, click on Change… under the Virtual memory section.
4 In the Virtual Memory window that appears, uncheck Automatically manage paging file size for all drives and then click OK twice to close both windows.
5 Now open File Explorer again and go to your C: drive. Right-click on the Users folder and select Properties from the context menu once more time
6 . In the Properties Window that appears this time, go to Location Tab. Click the Move… button.
7 A new window will pop up asking where you want to move this Folder. Select New location which is another Drive than the current one where the user’s Folder resides
8 . After selecting the new location Click Apply followed by OK .9 Close all windows now, Reboot the computer for changes To take effect10.
That’s It !
Conclusion
If you’re running out of space on your primary drive, you can move your Users folder to another drive. This is a simple process, but it’s important to follow the steps carefully.
First, open Finder and go to your primary drive.
Right-click on the Users folder and select “Get Info.” In the Get Info window, click the checkbox next to “Locked.” This will prevent any changes from being made to the folder while you’re moving it.
Next, open a new Finder window and navigate to your secondary drive. Drag the Users folder from your primary drive into this window. You may be prompted to enter your administrator password during this process.
Once the transfer is complete, go back to the first Finder window and uncheck the “Locked” box next to Users. You can now close both Finder windows.
Your Users folder has now been moved to your secondary drive!