
 by
by An Internet Protocol camera, or IP camera, is a type of digital video camera that receives control data and sends image data via an IP network. They are commonly used for surveillance but unlike analog CCTV cameras can be used for remote viewing and recording over the internet. To connect your IP Camera to a Wireless Router, you will need:
-An Ethernet cable –A Wireless Router -The Camera’s Power Adapter -The Camera’s Installation CD
First, connect the Ethernet cable to the LAN port on the back of your router and plug it into the port on the back of your camera. Next, power on your router and wait for it to initialize.
Now would be a good time to insert the installation CD into your computer.
- Verify that your camera supports Wi-Fi
- Find the SSID and password for your router
- Connect the camera to the router using an Ethernet cable
- Launch the configuration tool for your camera and find the wireless settings page
- Select the SSID of your router from the drop-down menu and enter the password in the appropriate field
- Save your changes and reboot the camera to complete the connection process
How to Connect Wired Ip Camera to Wifi Router
If you have a wired IP camera, there’s no need to worry about connecting it to your WiFi router. Here’s how to do it:
- Connect the Ethernet cable from your camera to the LAN port on your router.
- Make sure that your camera is powered on and connected to the Internet.
- In your browser, type in your router’s IP address and access the admin panel.
- Find the DHCP settings and make sure that DHCP is enabled. This will allow your router to automatically assign an IP address to your camera.
- If you want to connect using WPS (WiFi Protected Setup), find the WPS button on both your router and camera and press each one for two seconds or until they start blinking rapidly
- If you don’t want to use WPS, find the WiFi network name (SSID) and password for your router in the network settings, then open up the configuration page for your camera and enter that information into the wireless connection setup wizard
- Once you’ve entered all of the necessary information, save changes and exit out of both pages. Your wired IP camera should now be connected wirelessly to your WiFi router!
Credit: www.cctvcameraworld.com
How Do I Connect My Ip Camera to My Router?
An IP camera is a type of digital video camera that receives and sends data over the Internet. They are commonly used for surveillance purposes, but can also be used for things like baby monitors or pet cams. In order to connect your IP camera to your router, you will need an Ethernet cable and a power supply for the camera (if it is not battery-powered).
- Begin by connecting the power supply to the camera. If you are using an AC adapter, plug it into an outlet. If you are using batteries, insert them into the battery compartment.
- Next, take your Ethernet cable and plug one end into the port labeled “Ethernet” on the back of the camera.
- Plug the other end of the Ethernet cable into an available port on your router.
- Once everything is plugged in, turn on your router and then turn on your IP camera.
How Do I Connect My Wireless Router to My Camera Router?
In order to connect your wireless router to your camera router, you will need to follow these steps:
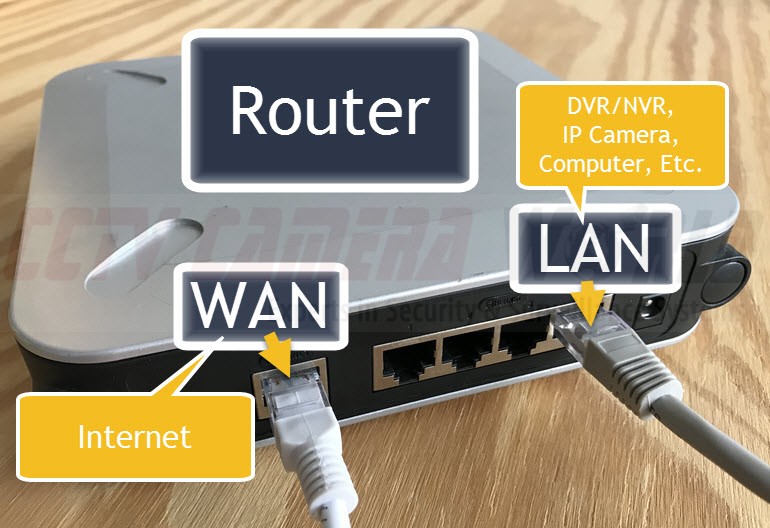
- Locate the WAN port on your camera router. This is typically a yellow port.
- Connect an Ethernet cable from the WAN port on your camera router to the WAN/Internet port on your wireless router.
- Power on both routers. Allow a few minutes for each one to fully boot up and connect to the network.
- Once both routers are online, open a web browser and type in the IP address of your camera router into the URL bar. This can be found in the documentation that came with your device or by doing a quick Google search.
- Enter the username and password for your camera router when prompted then click “Login”
- Navigate to the Wireless settings page and look for an option called “Client Mode”, “Bridge Mode”, or something similar then select it
- Save your changes then reboot both routers once again
- After they have come back online, open a web browser and type in the IP address of your wireless router into the URL bar this time
- Enter the username and password for this device when prompted then click “Login”
- Navigate to where you can change the SSID (name of WiFi network), password, and other such settings then make any changes you deem necessary
- Save these new settings then power off both routers again
- Wait about 30 seconds before powering them back on again so that all changes can take effect correctly
- That’s it!
How Do I Connect My Camera to Wifi?
Assuming you would like a blog post discussing how to connect your camera to WiFi: “How do I connect my camera to WiFi?” There are a few different ways that you can connect your camera to WiFi.
The first way is by using an Ethernet cable. You will need to plug one end of the cable into your router and the other end into your camera. Once the connection is made, your camera should be able to access the internet.
The second way you can connect your camera to WiFi is by using a wireless adapter. This method is similar to connecting your computer to WiFi. You will need to plug the adapter into your camera and then find the correct network name (SSID) and password for your router.
Once connected, your camera should have internet access. The third way you can connect your camera to WiFi is through a smartphone or tablet. Many newer cameras have apps that allow you to use your device as a wireless hotspot.
This means that you can connect your camera to WiFi by simply opening up the app and following the prompts. Once connected, your phone or tablet will act as a bridge between your camera and the internet. There are many reasons why someone might want to connect their camera to WiFI.
. For example, it allows you tp transfer photos wirelessly from the device directly to a computer or social media site. It also enables certain features on the camera to work such as remote shutter release, real-time image transfer, live view display, GPS tracking, and more.
Additionally, some cameras come with their own wifi networks while others require an existing one. In order to connect a camera to the internet, users will need to follow specific instructions depending on their type of device and network setup.
How Do I Connect My Ip Camera to the Internet?
If you want to connect your IP camera to the internet, there are a few things that you’ll need to do. First, you’ll need to make sure that your router is properly configured. You’ll need to set up port forwarding on your router, and you’ll also need to know the IP address of your camera.
Once you have those things set up, you can use a program like Blue Iris or SecuritySpy to view your camera’s feed from anywhere in the world.
How to connect the camera to wifi router?
Conclusion
If you want to connect your IP camera to a wireless router, there are a few things you need to do. First, make sure that the router is compatible with the camera. Second, connect the camera to the router using an Ethernet cable.
Finally, configure the router to work with the camera.